Thursday, April 26, 2012

Kwik Sew 3453 Puffy Vest - Item 7 Completed

This was a fun piece to make. The pattern is  Kwik Sew 3458 and I used a fleece back quilted nylon that I bought from Fabric.com.


Kwik Sew 3453

Pattern Description:  Misses' close-fitting vests have side panels, stand-up collar, armhole bindings and forward shoulder seams. (From back of Kwik Sew Pattern). I made View A with the zipper.

Pattern Sizing: XS-XL. I made a S.


Did it look like the photo/drawing on the pattern envelope once you were done sewing with it?
Yes, although I did not use a contrast fabric and I finished the armholes with a satin bias on the inside rather than the armhole bindings they suggested.

Were the instructions easy to follow? Yes, I really like Kwik Sew instructions. I found them to be clear and concise. As I used a different fabric to their suggestions, I did have to think ahead about how to finish some of the seams to avoid my fabric fraying.

What did you particularly like or dislike about the pattern?  I like the pockets on this vest as they are easy to construct and a decent size. I also like the side panels - they give the vest a nice shape.

Fabric Used: A fleece backed quilted nylon purchased from Fabric.com.

Pattern alterations or any design changes you made: I changed the collar finish because if I left it as it was, you would see the inside seam when I had it unzipped and that would look a bit messy. So I ended up folding over a seam allowance and handstitching this in place to give a neater finish. I also used satin binding on the inside of the armhole as this fabric had very minimal stretch and I didn't think the binding method suggested would work well on my chosen fabric. In hindsight I think I should have allowed slightly more seam allowance when I cut it out as it is made for a polar fleece type fabric that has a bit of stretch to it and my fabric did not stretch much at all.  Also, the seam allowances on this pattern are 1/4" so no room for error really.  Still it worked out fine, but a little more snug :)
Would you sew it again? Would you recommend it to others?  This is the third time I have used this pattern, so I probably will again.  I would recommend it to others. I made no alterations with the length so a taller person would need to add more length.

Conclusion: A great Kwik Sew pattern.

I'm looking forward to cooler weather to try this vest out with my other Wardrobe Basics.

 I only have one more item to go now - the dark skinny jeans.  I am going to use a pattern I have made before (pictured here) Jalie 2908 - the mid rise version altering the leg to make it into a skinny (not too skinny!) jean.


Wednesday, April 25, 2012

Sewaholic 1201 Renfew Top - Item 4 Completed

The next item that was on my list for the Wardrobe Basics SewAlong was Item 4, the Black Turtleneck. Turtlenecks are not a flattering look for me at all, so I decided to give the Renfew Top a go seeing as I do really like cowl neck tops.


Pattern Description:  The perfect basic tee! The Renfrew Top is a fitted knit top with sleeve and neckline variations. View A has long sleeves and a scoop neckline. View B has short sleeves and a deep V neckline. View C has a dramatic cowl neckline and three-quarter length sleeves. Mix and match any of the sleeves with any of the neckline options for unlimited possibilities! (From Sewaholic Website)

Pattern Sizing: 0-16. I made an 8.

Did it look like the photo/drawing on the pattern envelope once you were done sewing with it?
Yes. I made View C.


Were the instructions easy to follow? The instructions are very easy and I think a beginner sewer would really enjoy this project as it is easy and fast to construct. Also, the bands are easy to put on, so there is no need to worry about how to hem the knit fabric.

What did you particularly like or dislike about the pattern? I really like how the cowl sits and also that the cowl is not low cut, so no revelations are made when leaning over! 

Fabric Used:  A black Ponte De Roma Knit purchased from Lincraft.

Pattern alterations or any design changes you made: I shortened the top by 1" when I originally cut it out.
Would you sew it again? Would you recommend it to others? Yes, absolutely.  I am looking forward to trying the other versions too.   A very easy and quick pattern.

Conclusion: I think I will get a lot of use out of this top. Great pattern - give it a go!

The next item on my list is the Puffy Vest. I have some great fleece backed quilted fabric that I bought from Fabric.com so I'm looking forward to sewing this one up.


Tuesday, April 24, 2012

Simplicity 2054 - Black (Grey) Dress - Item 9 Completed

For the next item in the Warbrobe Basics SewAlong, I decided to make a grey dress instead of a black one. I used Simplicity 2054, View A:


Living in a hot climate, I've had to use my imagination of cold weather to work out how to wear this one. I really like how the dress and the cowl are seperate pieces so you can wear them with other items. 


Pattern Description:  Misses' knit dresses and cowl - collar sewing pattern, Cynthia Rowley Collection. (From Simplicity Website)
Pattern Sizing:  6-22. I made a 14.

Did it look like the photo/drawing on the pattern envelope once you were done sewing with it?
Yes. I made View A.

Were the instructions easy to follow? The instructions are very easy as the dress is just 4 basic pattern pieces rather like a t-shirt dress really. I didn't follow the instructions the whole way through as they have you hem the sleeves before setting them in the sleeve and I wanted to check the length of them after I had done this as I knew they were going to be too long. I coverstitched all the hems and the neckline. I also constructed the whole dress on my overlocker without using the sewing machine for the seams.  I think if I made this again, I would put the sleeve in on the flat rather than using the set in method. The cowl instructions as very easy and make for a neat finish.

What did you particularly like or dislike about the pattern? I like how you can use the dress and the cowl seperately. There is not much shape to the dress but i think I'm ok with that.  I made a 14 as I didn't want it to be tight across the back and not too fitted.

Fabric Used:  Sophia Double Knit purchased from Fabric.com

Pattern alterations or any design changes you made: I shaved off 1cm from the armcycle and shortened both the sleeves and bottom hems by 6cm.
Would you sew it again? Would you recommend it to others?  I think I might sew the cowl again as I think it would be quite versatile. Still thinking about whether I would sew the dress or not. I'll have to wait for the weather to get colder to see how much I wear it.

Conclusion: Another item completed for the Wardrobe Basics SewAlong. Easy and quick pattern.

I'll be back soon with another completed item from the Wardrobe Basics SewAlong the Black Turtleneck.

Wednesday, March 28, 2012

Vogue 1247 - Camel Skirt - Item 5 Completed


I have finally finished my Camel skirt for the Wardrobe Basics SewAlong.  I used this pattern:


Pattern Description:  Semi-fitted A-lined skirt has front in-seam pockets. (From back of Vogue Pattern)

Pattern Sizing: 6-18.  I made a 14.

Did it look like the photo/drawing on the pattern envelope once you were done sewing with it?
Yes, I think so. Mine is a little longer

Were the instructions easy to follow?  Yes, overall I found the instructions very good. I was a little confused about understiching the pockets as after doing this, I still have a small raw seam there so not sure exactly if this was supposed to happen. If anyone else has made this and has tips on this, it would be greatly appreciated :)

What did you particularly like or dislike about the pattern? I love the fit of this skirt and I really like the waistband. The instructions have you finish the seams using binding and although I love how this looks inside, it was quite time consuming. I also love, love the pockets.


Fabric Used:  A lovely wool blend.

Pattern alterations or any design changes you made:  I lengthened the skirt by 1"  and it is still fairly short but I like the length. I used a blind hem stitch on my sewing machine to hem the fabric.
Would you sew it again?  Would you recommend it to others?  Yes, definately. I think I'll make the next one in denim.

Conclusion: A lovely, stylish pattern. I think this will be another great addition to my wardrobe.

Next up, I think I'll make the puffy vest or the black (or in my case, grey) dress. Oh decisions, decisions....

Wednesday, March 14, 2012

Abby Cardi - Item 6 Completed


I just completed the Tie Waist Sweater as part of the Wardrobe Basics SewAlong yesterday. Here is my review:

Pattern Description:  Great jersey cardi to have for all occasions, wear it over your cami or dress, knot it at the front or leave it casually hanging down casually. Optional 2 sleeve lengths. (From StyleArc Website) I made the short sleeve version.

Pattern Sizing: Sizes 6-30 (individual sizes purchased seperately). I made a size 10.

Did it look like the photo/drawing on the pattern envelope once you were done sewing with it?
Yes, I think so.

Were the instructions easy to follow? This is a quick cardi to put together. However, I did struggle with how to attach the back neck to the outer back collar but I got there eventually with a lovely friend's help . Once again, the Style Arc instructions are like an order of construction and are fairly brief.  After constructing the  collar, this is an easy pattern. I rolled hem the bottom hem and coverstitched the sleeve hems.

What did you particularly like or dislike about the pattern? I like how this pattern can be used as a lightweight cardi which is great for the climate I live in. It would make a nice long sleeve cardi too. The length I think is perfect for me but if you were taller, I think you might like to add some length.

Fabric Used: Rayon Lurex Jersey Knit from Fabric.com

Pattern alterations or any design changes you made:  I handstitched the facing neck seam instead of using the machine. I didn't trust it to look good with machine stitching.


Would you sew it again? Would you recommend it to others? I might sew it again. Time will tell!

Conclusion: The cardigan drapes well and is comfortable to wear. I'm also pleased with the sizing.

Tuesday, March 6, 2012

Abby Cardi - Tie Waist Sweater Item 6 - Planning

The next item I'm making for the Wardrobe Basics Sew Along is the Tie Waist Sweater. When I ordered my Kate Top pattern from Style Arc, the bonus pattern was the Abby Cardi:


I think I will make the 3/4 sleeve version as I live in a fairly warm climate and think I will get more wear out of this style (but I might still change my mind).  I'm going to use this fabric purchased from Fabric.com:


I have purposely chosen this pattern as it calls for a rolled hem on the hem of the cardi and I really want to get better at this skill on my overlocker/coverstich machine. I've also had good success with the fit of Style Arc patterns so far, so fingers crossed this one works as well too. 


Saturday, March 3, 2012

White Shirt - Item 3 Completed


I have finished my basic white top for the Wardrobe Basics Sew Along. I made the Kate Top from Style Arc.   I think this a definately another versatile addition to my wardbrobe. I used Stella Knit and the quality of the knit is very good . It is a good weight for a t-shirt without being too heavy.

Pattern Description:  Long sleeve with rib cuff, round neck top, slightly fitted.

Pattern Sizing: Sizes 6 -20 (individual size purchased seperately). I made a 10.

Did it look like the photo/drawing on the pattern envelope once you were done sewing with it?  Yes.

Were the instructions easy to follow? The instructions are brief but this is a fairly easy top to put together. They contain a useful diagram on how to do the neck binding.

What did you particularly like or dislike about the pattern?  I really like the cuff detail and also the way the top looks very RTW. I didn't have to do a FBA which is also a great win.

Fabric Used: Stella Knit purchased from Crafty Mamas

Pattern alterations or any design changes you made: I stabilised the the shoulder seams with a strip on iron on stretch interfacing. I cut off 1 5/8" off the hem and also 2" off the sleeve before attaching the cuff band.


Would you sew it again? Would you recommend it to others? I think I will definately sew it again - maybe a stripe fabric next time.


Conclusion: A great white top - super comfortable and will be great for winter.

Monday, February 27, 2012

White Shirt - Item 3 Progress


It has taken a while to get this item for the Wardrobe Basics SewAlong off to a start due to a wait on my white knit fabric.  I think it has been worth the wait though as the fabric is a lovely quality knit with great recovery. I'm trying to make things that last, rather than use fabric that stretches out after one wash.
I'm using the Kate Top pattern from Style Arc and have measured it against a RTW top I have already and I think the sizing will be fairly accurate.
Some things I have noticed so far:
  • The Kate Top pattern is in whole pieces (as in a whole front and back etc) and this is the first time I have cut out a pattern using whole pieces (normally I place items on the fold)
  • The Kate Top has some nice shaping through the sides so I look forward to seeing how it looks made up.
  • For some reason, I could not find white rib knit anywhere so I have resorted to cutting up a white singlet for the cuffs.
Well that is all for now and I'll be back next time with my finished Kate Top.

Friday, February 17, 2012

White Shirt - Item 3 Planning

The next item for the Wardrobe Basics Sew Along is the White Buttton Shirt.  I lead a pretty casual life so I really don't need a dress shirt so I have decided to make a casual White Top. I'm going to try out another Style Arc Pattern - the Kate Top:

Kate Top sewing pattern
Style Arc Kate Top


I've ordered some Stella Knit from Crafty Mamas  and hope to pick up the ribbing for the sleeves from my local fabric store. I love that this Sew Along is keeping me on track with my sewing and also that I can try new patterns and fabric - so fun!

Wednesday, February 15, 2012

Simplicity 4032 - Faux Fur Vest - Item 8 Completed

What a fun item this was and I think I will really enjoy using it as part of my wardrobe this coming winter.


Pattern Description: Misses Jackets and Vests (I made View E Vest with some modifications)

Pattern Sizing: Sizes 8-24 (I made a size 10)

Did it look like the photo/drawing on the pattern envelope once you were done sewing with it?
The princess seams are the same but it looks different because I made it in faux fur and didn't attach the ruffle.

Were the instructions easy to follow? They were very easy but I only followed the first section and then used this tutorial to line the vest.

What did you particularly like or dislike about the pattern? I like the shaping of the vest and the pattern was well drafted. The length worked perfectly for me but if you were tall, you would definately need to add more length. It also seems quite narrow in the back.

Fabric Used: Faux Fur purchased from Lincraft and Acetate lining also purchased from Lincraft.

Pattern alterations or any design changes you made: After trying the vest on halfway through, I realised there wasn't much room in the back, so I made a narrower side seam than the recommended 1.5cm seam allowance.

Would you sew it again? Would you recommend it to others? I might sew it again in another fabric but I do like my vests to be lined so would add the lining again. I would recommend it to others but would say check the length of the vest carefully before cutting.

Conclusion: I really like my new vest - it is great to try something new and I think I will get lots of use out of it.

Monday, February 13, 2012

Faux Fur Vest - Item 8 Progress

The vest so far...

I have been working on Simplicity 4032 for the Wardrobe Basics Sew Along.  Sewing with fur is certainly a new experience for me. Some points I have noticed so far:

  •  When cutting the fur out, if possible it is best to try and cut the backing and not the fur itself,   otherwise you end up with fur everywhere.
  •  I couldn't mark any notches in the fur at all (you simply just can't see them due to the pile in the fur) so I used a washable blue marker to do all my markings.
  • I'm using  a size 14 ballpoint needle and have lenthened my stitch just slightly and this seems to be working very well on the fur.
  • Simplicity 4032 is not lined so I am using this tutorial to line the vest. 
  • When sewing the fur I have had to "eyeball" my seam allowance due to not being able to see the measurements on my machine. Probably not the greatest method, but I don't think you will be able to tell due to the pile of the fur. The picture below shows what I mean by not being able to see your measurements for the seam allowance with the fur.
  •  

  • And last but not least, it is Summer here in Australia, so sewing and fur is one hot experience!

Wednesday, February 8, 2012

Simplicity 4032 and Faux Fur - Item 8 Planning

The next item I'm planning on making for the Sew Along is Item 8 - a Faux Fur Vest.  I'm going to use Simplicity 4032 (View E) with some modifications.

I'm going to line the vest and won't be attaching the ruffle (would be a bit tricky with fur hey?). Lincraft (Australian shop) were having a half price fabric sale, so I was able to pick up this lovely soft, mink like fur at half price.


 I also bought the lining at Lincraft and it is a toffee brown colour.  I will make some notes in the next post about my progress. So far my advice is - get out your vacuums girls! That fur sure does go a long way!

Saturday, February 4, 2012

Elle Pants - Item 1 Complete

I completed the Elle Pants and I'm happy with the result:


Pattern Description: (From Style Arc Website) This is the pant of the moment, slim line from ankle to waistline. Elastic waist 35mm or 1 ¼ inch wide. These pants sit so beautifully without any bulk, wear them with your high heels out for the night or with your sneakers for brunch.....a must have piece in your wardrobe!
Pattern Sizing:
6-30 (Each size puchased seperately) I made a 10.
Did it look like the photo/drawing on the pattern envelope once you were done sewing with it?
Yes
Were the instructions easy to follow?
Yes, very easy and clear instructions.
What did you particularly like or dislike about the pattern?
I really like the slim line of the pants and also that they are fitting without being "tight". Another bonus is how the waistband sits flat without adding any bulk (as mentioned in the pattern description).
Fabric Used:
Sophia Double Knit purchased from Fabric.com
Pattern alterations or any design changes you made:
I'm fairly short so I cut off 3 3/4" off the hem. Next time I would also cut about 1/2" of the top of the pants before attaching the waistband as the pants sit above my belly button and I'd probably prefer them a little lower (I think this is due to my height).
Would you sew it again? Would you recommend it to others?
Yes to both.
Conclusion: My first Style Arc pattern. Very easy to sew. A terrific wardrobe basic and can't wait to try some more Style Arc patterns now.

I'm having a terrific time with the Sew Along so far.

Tuesday, January 31, 2012

Elle Pants - Item 1 Progress

I have made some good progress on my Elle Pants today and think I will be able to post the finished product over the next couple of days. Some things I have noticed so far:
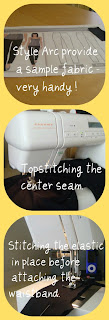
  • The instructions for the Elle Pants are straight forward and easy to follow. They also include some nice finishing RTW touches such as topstitching the center seam.
  • The fit seems to be pretty spot on.  I ordered a 10 according to the measurement chart and I think this is very accurate to the pattern.
  • The Elle Pants are close fitting, but not too close fitting - the pattern is drafted very nicely.
  • I'm very pleased with the fabric I have chosen from Fabric.com - I think the Sophia Double Knit will last a long time.

Next post will be the finished product!

Monday, January 30, 2012

Elle Pants and Ponte Knit - Item 1 Planning

The first item in the Wardrobe Basics Sew Along is Slim Black Pants. When I read about the Sew Along, I preordered my black Ponte fabric from Fabric.com (Sophia Double Knit Black).  It arrived yesterday and is a nice weight and quality.
For the pattern, I am using the Elle Pant from Style Arc which arrived today! This is the first time I have used Style Arc and I'm looking forward to trying out this pattern. I've heard great things about the fit, so fingers crossed.

Style Arc - Elle Pant

Let the sunshine in...

Image source: Clipartof
I love sewing so here is my first post. I've started this blog so I can participate in the Wardrobe Basics Sew Along run by Lori (Girls in the Garden) and Lynnne (Wonderfully Made ).   I sewed a fair bit in my early twenties and have just returned in the past year, in my mid thirties. I'm really looking forward to expanding my sewing skills this year and making items that I'm happy with, even if it takes me a bit longer. I thought Lori and Lynne's  Sew Along was just the thing to get me started. I've been an avid listener to Lori's podcast and I look forward to sharing my progress and learning lots from the other participants in the Sew Along too.